-
Posts
889 -
Joined
-
Last visited
Everything posted by dtarin
-
There is a bug from 7.2.9 to 7.2.11, see https://forum.pvsyst.com/viewtopic.php?f=4&t=5669. Very problematic, I downgraded to 7.2.6 until it is resolved.
-
It is showing you the loss there of 0.1%. Set the combiner distance to 0.6m to enable the optimization box to minimize copper mass. it has little effect on the result.
-

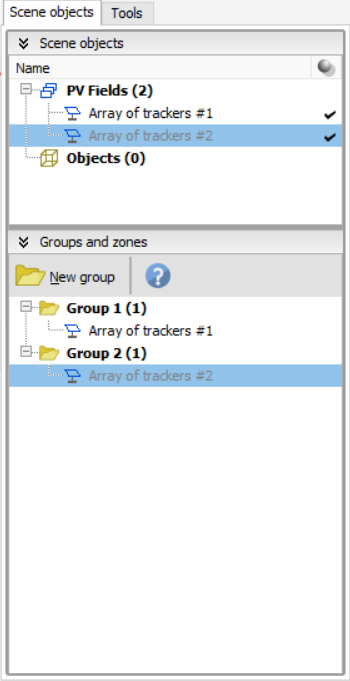
Shading scene with fixed tables and E-W trackers
dtarin replied to iulian.trisca's topic in Shadings and tracking
Run both simulations separately, then add the energy in excel. You will need to recalculate things like capacity factor, yield, etc. based on the total plant size. For other parameters such as PR, POA, and the waterfall losses, you will need to use a weighted average to determine these. -

Unsure about accuracy of Enphase IQ7A microinverter data
dtarin replied to DyJohnnY's topic in PV Components
Your best bet is to reach out to enphase directly. -
Getting this in 7.2.11. Cannot save as new variant to resolve, or create a new shade scene; problem still persists.
-
Your modules are too close together. Create spacing between modules, and make sure there are no other objects penetrating the modules. You can use "Check Scene Validity" under tools to identify the modules that are impacted.
-

Tracking mode electrical losses. Bactracking algorithm
dtarin replied to tecnun's topic in Simulations
That is correct; albedo concerns albedo irradiance. Correct Yes in fixed tilt systems there will always be a beam loss (for multi row systems). The electrical losses are separate from irradiance losses, however. One or more tracking manufacturer(s) have presented half-cell backtracking optimization, however I do not know what PVsyst is currently working on as far as implementing the more advanced backtracking methods in the market (I do not work for PVsyst). Implementing backtracking for every single table in the shade scene would be nice, but I am sure there are challenges with doing so. -
Inverter losses due to temperature derating will be captured in Inverter Loss over Nominal Power if the OND file has defined a temperature derating curve. Verify that the OND file does and it matches the inverter spec sheet. PVsyst will not break these temperature related losses out separately, but with some work in excel, you could determine the hours and amount of clipping coming from temperature derates.
-

No LID Losses in the PVsyst 7.2.6. batch simulation variables
dtarin replied to cristianavarro18's topic in Simulations
LID loss is available as a batch variable and an output variable. You probably have not defined an LID loss in the variant you are running, and so PVsyst will not display the variable. Enter a non zero LID and save the variant. When you run your batch runs with desired LID values, it will override what you have saved in the variant and then will be available in the variable output. -

Tracking mode electrical losses. Bactracking algorithm
dtarin replied to tecnun's topic in Simulations
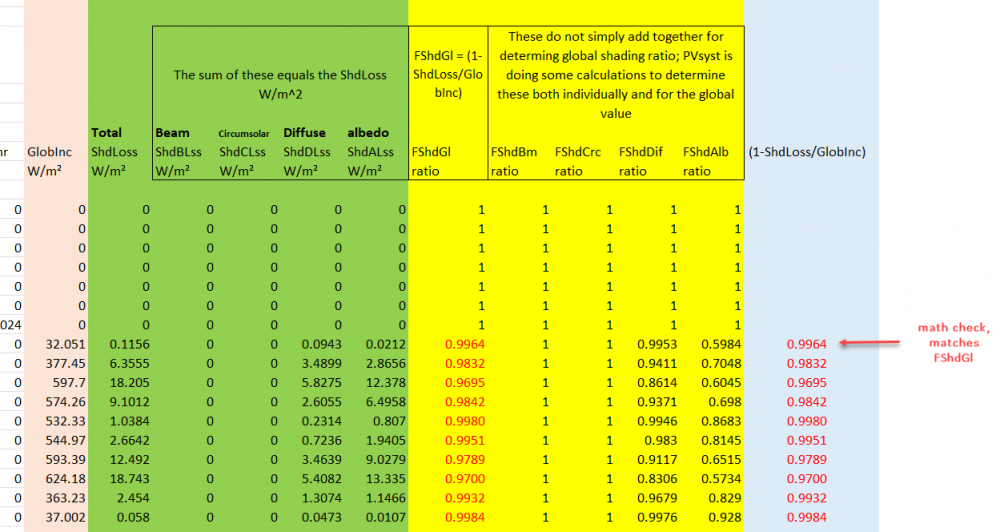
These are shading loss factors, so 1-FShdBm = 0% beam loss. 1-FShdGl = 1-0.9846 = 1.54% global shading loss. The individual shading ratios are not as informative when we dont know the calculation steps PVsyst is taking, but the global shading ratio can be calculated, see screenshot. When there is backtracking and no shading objects or terrain consideration, the beam loss is zero, which is why it is showing a value of 1 for the ratio. So, a value of 1 = 0% loss, a value less than 1 means there is a shading loss contribution for that irradiance component. *There is not a horizon shading loss in this example, but if there were, then it would not be GlobInc in the denominator, but instead GlobHrz (global irradiance after horizon loss) -

Tracking mode electrical losses. Bactracking algorithm
dtarin replied to tecnun's topic in Simulations
What this is telling us is that the shading losses are contributed by the diffuse and albedo components. If you refer to the link below , it states that the albedo component is affected by both the size of the plant and by the tilt, and effectively for large plants the albedo is near-zero. I suspect there is a mathematical operation on the albedo shading factor we see in the 8760 before computing the global shade factor. https://forum.pvsyst.com/viewtopic.php?f=30&t=2522 -

Grid power limitation in collective self-consumption
dtarin replied to MGLopez's topic in Simulations
That is an outdated post. It has option to limit at the inverter or the point of interconnection. -
Extruded polygons are not included in the object management menu in 7.2.9.
-
I do not know why parallel installations for subversions was removed, but when installing updates, there is not an option for it. There are bugs in every update, and replacing a current, working version for a bugged version is a waste of time if we need to go back to a previous install. We need to uninstall completely and then reinstall to go back to a previous version (see screenshot). We need to be able to evaluate two or more versions at once thoroughly, and it can take time. If there is some method I am not aware of, please let me know, but I just installed 7.2.9 from 7.2.6, and did not see an option. I downloaded the installer from the website and did not update through the app update screen when the software loads.
-
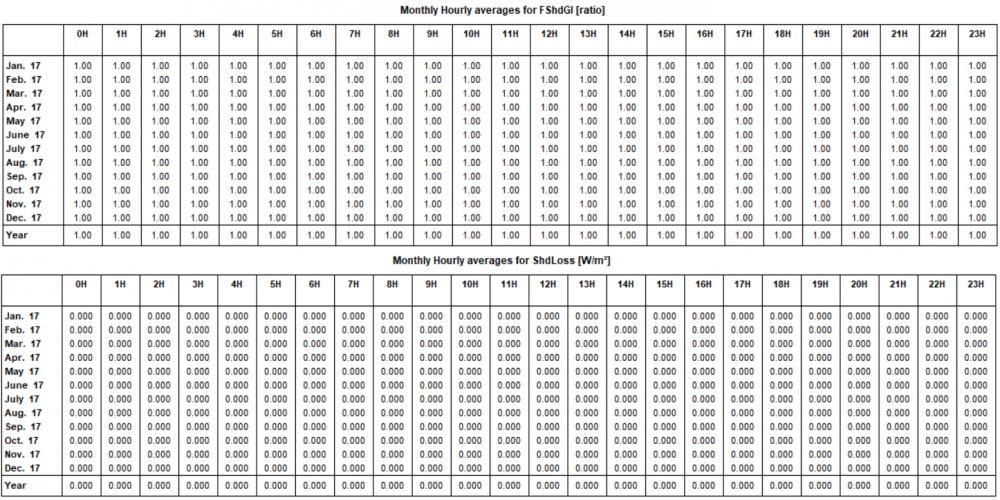
When trying to display different variables and factors in the 12x24 format, the results shown are incorrect. Referencing the screenshot below, my site has shading losses and the shading factors should not be equal to 1 for certain hours, yet in the table, it shows 1.00 for all hours. And similarly, it shows there are zero shading losses in W/m^2. Using PVsyst version 7.2.9.
-

Tracking mode electrical losses. Bactracking algorithm
dtarin replied to tecnun's topic in Simulations
From https://forum.pvsyst.com/viewtopic.php?f=30&t=2522, -

IAM losses higher with newer modules?
dtarin replied to S Groenveld's topic in Shadings and tracking
Verify your IAM loss against a third party test report, and enter manually if necessary under detailed losses. PAN files can have any IAM profile entered into them before you receive it, which may or may not be based on a valid third party test. -
You cannot view or model subhourly data. When PVsyst imports subhourly data, it is converted to hourly.
-
You do not need to use it, but it comes down to your installation and how you want to model. Using the MPPT feature will be dependent on your OND file definition, string size, module. If for example you have 1 inverter with 2 MPPT, you will need to enter "2" where it says Nb of MPPT inputs to equal 1 full inverter. What this does is it then takes the max PV current of the inverter and divides it by the number of MPPT inputs, and models each of these inputs separately from one another. Generally PVsyst prefers an equal number of strings per MPPT input, according to the max current per MPPT input ("balanced"). You will need to consider the current and voltage on each input to be within the inverter's spec to minimize clipping losses. In some cases, the results are the same with or without it if the system is balanced and within the inverter's spec. In other cases, if you have an odd number of strings or unequal strings across the MPPT inputs, you can end up with very high (and possibly unrealistic) clipping losses. For example, say you have 5 strings on 1 inverter with 4 MPPT inputs; you could end up with 10% clipping losses if you model with MPPT enabled. But if you disable this feature, and just model 5 strings on 1 inverter, you would end up with only 2.8% clipping losses. So which is correct? It comes down to your installation. For string inverters, you can have them installed so the MPPT inputs are independent of one another. In this case, you will use the enable MPPT feature. If your inputs are jumpered (connected together internally), they will share the incoming current from all strings, and you will disable MPPT feature. Another use for the MPPT feature is if you have different modules or string sizes connected to one inverter (1 string of 18 modules, 1 string of 17 modules, etc). Generally it is better to not have it enabled, and reflects actual PV plants as they're typically built. In all projects I have modeled that have gone to construction, string inverter inputs are jumpered and not operating independently.
