.png.5a0f08430bae173944a56977dd41765f.png)

Muhammed Sarikaya
-
Posts
211 -
Joined
-
Last visited
Everything posted by Muhammed Sarikaya
-
Dear Afshin, It's not possible to do that. Regards,
-

Error for two orientation when imprting PVcase PVC file
Muhammed Sarikaya replied to ShivamPandey's topic in Problems / Bugs
Dear Zoe, In the system section, you need to create a sub-array for the second orientation and define it. It is also important to assign it to the second orientation. Regards, -
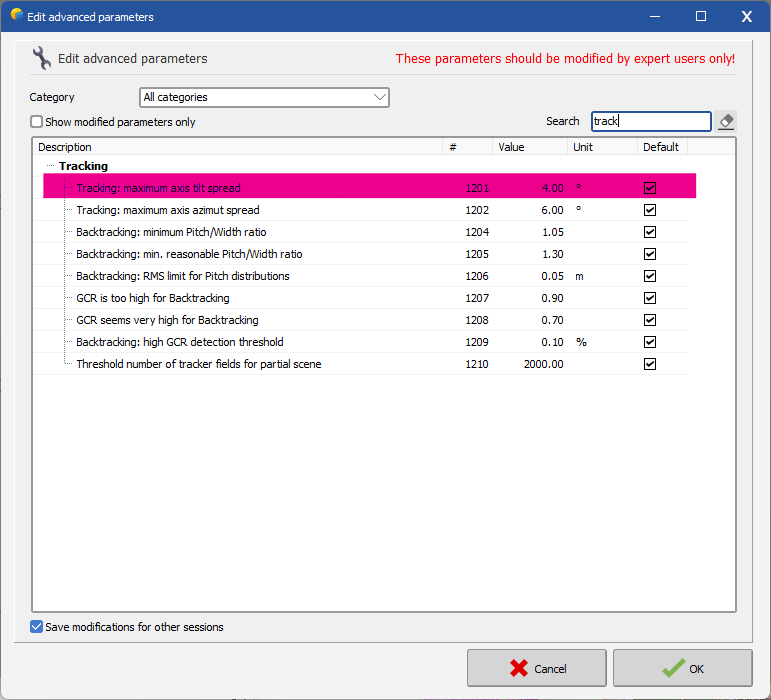
Dear Bakhtiyar, This parameter is a threshold for the RMS value of the pitch distribution that PVsyst finds in the 3D drawing. The bifacial models in PVsyst are an approximation that is valid for identical long rows with constant pitch (spacing). If the simulation uses a 3D drawing of the PV system, then PVsyst will check if this drawing comes close to this idealization. For this purpose, it will calculate the RMS of the pitch distribution, and if it finds a value larger than the threshold, it will issue an error message, and the simulation will not be possible. The default value of 0.1 m is not based on a specific study. The error message is meant to remind the user that the system which is being simulated, is not fully compatible with the idealized assumptions, and therefore an additional uncertainty of the bifacial contribution in the simulation results is to be expected. So far there is no study that quantifies the increase of uncertainty in the simulation results as a function of the RMS of the pitch distribution. It will become possible to address this, once we have a more sophisticated bifacial model, which will be based on the 3D drawing. This is in work and will still require several months of development. Regards,
-
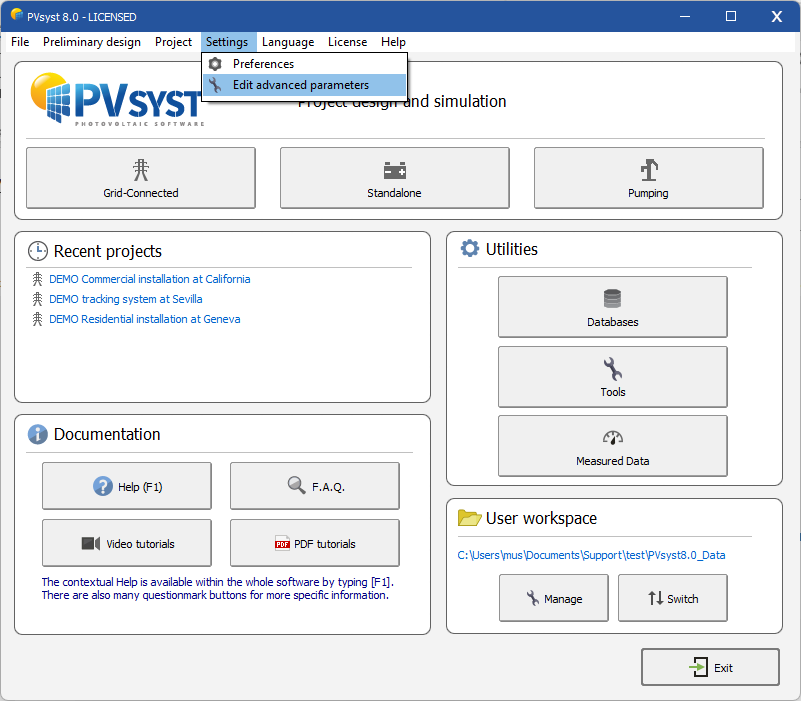
Dear Bakhtiyar, Go to "Settings - Edit Advanced Parameters" as shown below: Then, in the search box, type "bifacial" and modify the highlighted parameter as shown: This modification should resolve your issue. Regards,

-
Dear Bakhtiyar, Avoid adding too much detail to the 3D scene in SketchUp. You need to create a simple 3D scene—only this way can help resolve your freezing issue. Alternatively, you can upgrade your computer's performance to handle the detailed 3D scene. Regards,
-
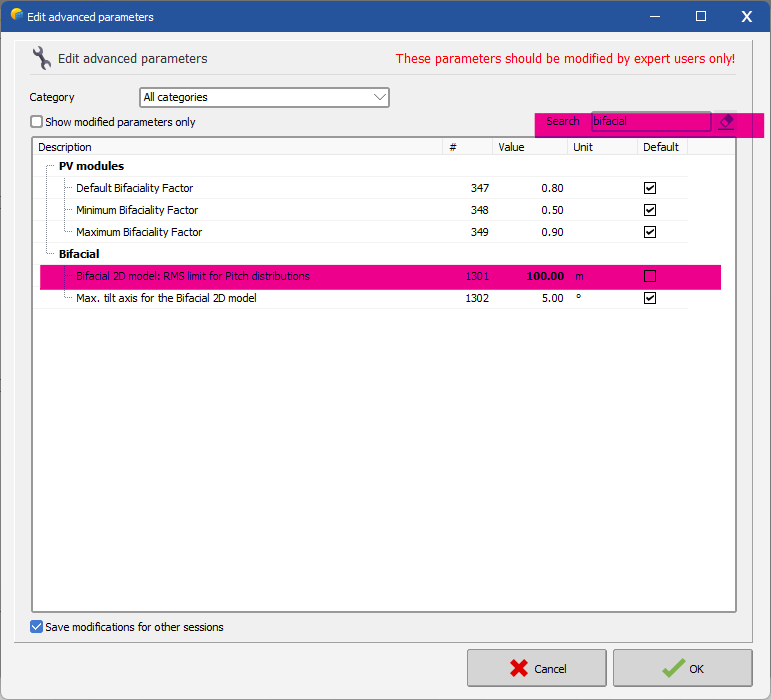
Dear, Try increasing this parameter as well: Go to "Settings - Edit advanced parameters." Type "spread" in the search box. It will display multiple parameters—increase all of them to 90° Regards,
-
Dear James, With bifacial modules, we can create projects with multiple orientations in the 3D scene. However, you must meet certain conditions: The PV tables must have the same width. The pitch between rows must be uniform. All PV tables must be identical. See the helps: https://www.pvsyst.com/help/project-design/bifacial-systems/2d-bifacial-model-conditions.html Regards,
-
Dear Yildirim, In "Edit Advanced Parameters," try modifying the following three highlighted parameters to 90°. Regards,
-
Dear Bruno, Can you please send us your project at support@pvsyst.com with a detailed message explaining your issue? Regards,
-
Dear Swonno This is a check to avoid interpenetration between the PV object and other objects, such as the ground. If part of the PV module is inside another object, that part will be completely shaded. Therefore, you should avoid placing it too close to other objects as much as possible. When using zone tools, you can determine the distance from the ground. If you set it to at least 1 meter above the topography, you shouldn't receive an error message indicating that your PV modules are too close to an object. Regards,
-
PVSyst optimization tool differs from single shot simulation
Muhammed Sarikaya replied to Emi's topic in Problems / Bugs
Dear Emi, It's difficult for me to assess and assist you with your simulation. Could you please send me your project at support@pvsyst.com? Regards, -
Dear Vasil, Depending on your project, you can add more PV modules in the 3D scene, but they must correspond to your "Orientation #1." PVsyst will then automatically match the final surface area of this orientation between the system definition and the 3D scene definition. Regards,
-
Enedis impose le Cos Phi à 0.94 sur les onduleurs
Muhammed Sarikaya replied to AnthonyP67's topic in PV Components
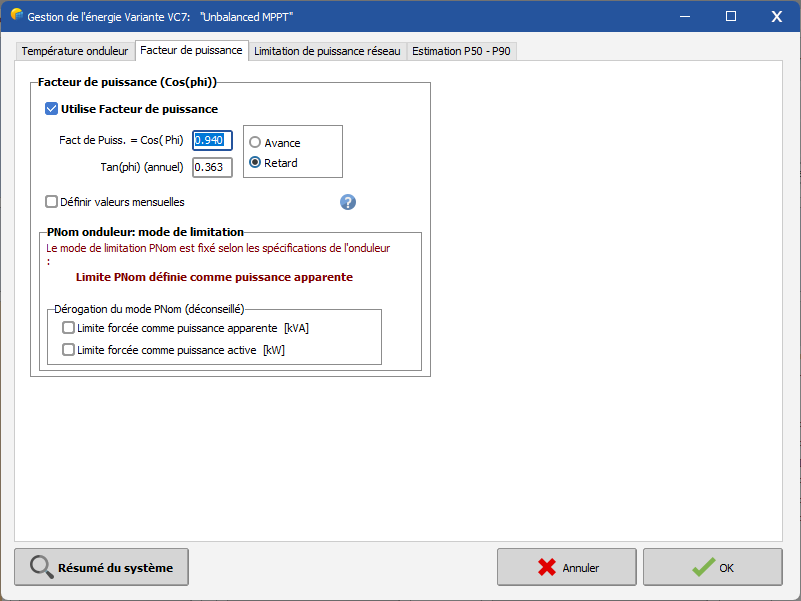
Bonjour, Vous faites certainement référence à l'injection dans le réseau avec un facteur de puissance. Pour cela, allez dans "Gestion de l'énergie", puis dans l'onglet "Facteur de puissance". Il est important de savoir si votre onduleur injecte du réactif dans le réseau. Selon le cas, vous devrez préciser s'il s'agit d'un facteur de puissance en retard ou en avance. Je vous conseille de consulter l’aide à ce sujet : https://www.pvsyst.com/help/project-design/grid-connected-system-definition/power-factor/index.html?h=power+factor Cordialement,
-
Dear Caner, Could you please send us your project via email at support@pvsyst.com? We need to investigate and understand the issue. Regards, Muhammed Sarikaya
-
Dear, Hybrid inverters are indeed not taken into account in PVsyst. However, you can run a simulation with storage by defining the self-consumption profile. This simulation will show the energy balance, including the energy injected into the grid, the energy stored in the battery, and the energy used by the user. I invite you to watch our tutorials explaining how to perform this type of simulation:
-
INVERTER LOSS OVER NOMINAL INVERTER POWER
Muhammed Sarikaya replied to Loïs Masson's topic in Simulations
Dear Loïs, Can you send your project by specifying which variant has the higher MPPT clipping loss and which one has the lower losses to our email? : support@pvsyst.com Regards, -
Dear, It’s not possible to have such detailed information in PVsyst; you only get the final simulation results. Regards,
-
Dear, Currently, the behavior of the inverter shutting down due to cold temperatures is not taken into account. Only high temperatures are considered to reduce inverter activity to protect themselves. Please refer to our OND file regarding this feature:
-
Dear Rvilloria, It’s possible; you just need to modify the advanced parameters to allow PVsyst to run the simulation. You need to adjust the parameter highlighted below: Regards,
-
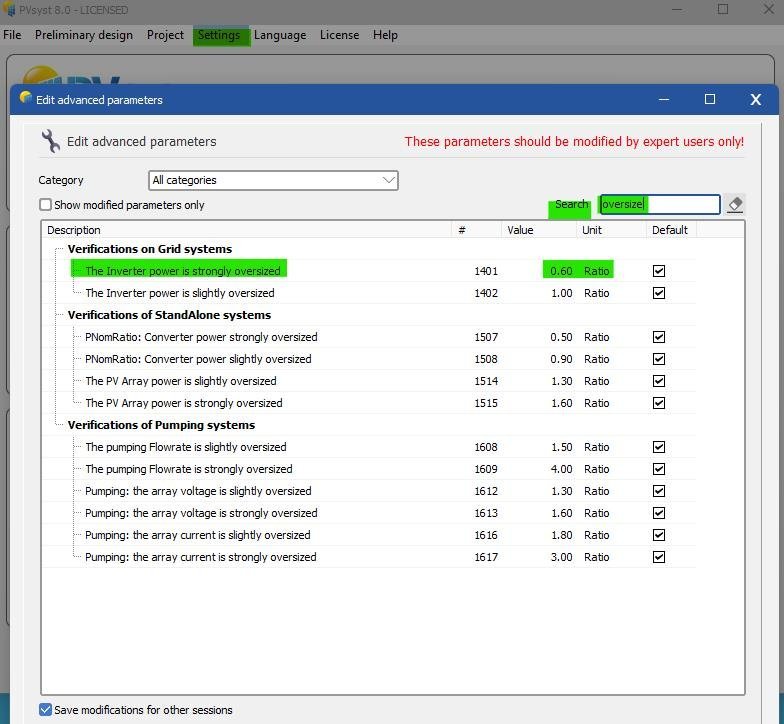
Dear Robin To solve this issue, you need to: Click on "Settings". Then go to "Edit advanced parameters". In the search bar, type "Oversized". Modify the parameter "The inverter power is strongly oversized" with the limit value you want to set. Below, you will find an explanatory illustration. Best regards,
-
Dear RobSolar, Transformer ohmic loss as %STC refers to the loss resulting from the wiring between the output of the transformers and the injection point. Regards, Muhammed Sarikaya
-
Dear Pranav, I invite you to send your DAE file to support@pvsyst.com along with your message, and one of our developers will examine the file and try to identify the issue. Regards, Muhammed Sarikaya
-
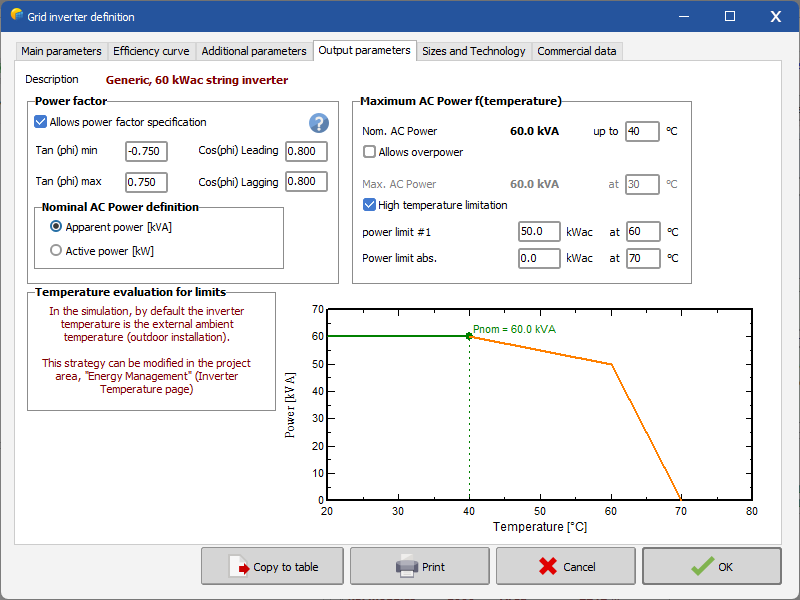
Dear Ikarkli, In the .ond file, you can find the "Output Parameters" tab and click on the "Allows Overpower" checkbox, as shown below: This means your inverter can reach 125 kVA at 25°C. Is this what you were looking for? Regards, Muhammed Sarikaya
-
Error for two orientation when imprting PVcase PVC file
Muhammed Sarikaya replied to ShivamPandey's topic in Problems / Bugs
Dear Shivam, I need to investigate your project, so could you please send it to us as a zip file at "support@pvsyst.com" by following this process: File - Export projects - select the project Regards, Muhammed Sarikaya