


Hizir Apaydin
-
Posts
107 -
Joined
-
Last visited
Posts posted by Hizir Apaydin
-
-
Dear Kenneth,
Your problem seems to correspond to an issue that we have corrected for the next version of PVsyst.
In order to be sure that your issue will be covered by this correction, could you please export and send your project file (PVsyst main menu "File>Export project") to support@pvsyst.com
Regards
-
Dear mja,
Yes transformer constant loss and auxiliaries consumption can result in a negative E-Grid value if the consumption is higher than the solar production.
Regards
-
3 hours ago, furkann71 said:
Which of the use in simulation options should I choose?
1-no shadings
2-linear shadings
3-
4-
??Dear Furkan,
"No shadings" is the default option when you haven't designed any 3D scene yet. Once designing your PV scene, you will have to choose between "Linear shading", "According to module strings" or "Detailed electrical calculations".
You can find details about these modes in the following links:
https://www.pvsyst.com/help/index.html?near_shadings_dialog.htm
https://www.pvsyst.com/help/shadings_model.htm
https://forum.pvsyst.com/topic/32-what-is-the-shading-loss-quotaccording-to-module-stringsquot/
Regards
-
3 hours ago, furkann71 said:
If I run the simulation after making a settlement according to the topology of my land in the close shadings tab for my project, will the production estimation result be based on these shading factors, that is, will it give results by evaluating the topology factors?
Dear Furkan,
Yes the simulation takes into account the shading factors based on your 3D scene
-
14 hours ago, furkann71 said:
Dear Furkan,
You can find in this help page the detailed procedure to create a zone: https://www.pvsyst.com/help/zones_of_tables.htm
Just draw your zone above the imported scene and click on "Fill zone":

-
Dear Kien,
The "by Wp" option is related to the total installed power of your system, not the price of individual PV modules.
For a system of 500kWp, 0.5$/Wp will be equal to a total system price of 250 000 USD (500 * 1000 * 0.5).
If you should give us details about your system (total installed power, number of modules etc...) we would be able to give you the exact calculation.
You can send details of your project (for example screenshot of Economic Evaluation tool) to support@pvsyst.com
Regards.
-
9 hours ago, furkann71 said:
Do I make a correct assessment by transferring the topography of the land to pvsyst with csv and then positioning and simulating it in pvsyt?
Or are there any other steps I need to take to make an accurate production estimate?Dear Furkan,
This is a correct way to perform the simulation.
Regarding the missing option "Transform to ground object", you need to update to last version of PVsyst, this is a recent option.
Regards.
Hizir
-
Dear Barbadori,
Ground objects are objects representing the topography of your location, meaning the terrain on which you will put your panels and other shading objects. Trees are not ground objects and should not be selected in this section.
Moreover, in order to speed up shadings calculations, it’s very important to simplify your 3D scene by removing unnecessary and complex objects. For example, do not include in your 3D scene a tree which will not shade any panel or a complex building with useless details such as windows, doors etc... Simplifying and removing useless trees should improve your simulation performance.
Regards.
Hizir
-
On 4/25/2023 at 7:15 PM, dtarin said:
This will adjust the elevation of the trackers, but not the tilt. To adjust the tracker tilt to the terrain, you will need to create a zone of trackers within PVsyst, and draw the zone over the terrain. When they are generated, they will have their tilt adjusted (as long as you select the option).
The other option is to use autocad or some other software to place the trackers on terrain with tilt adjusted.
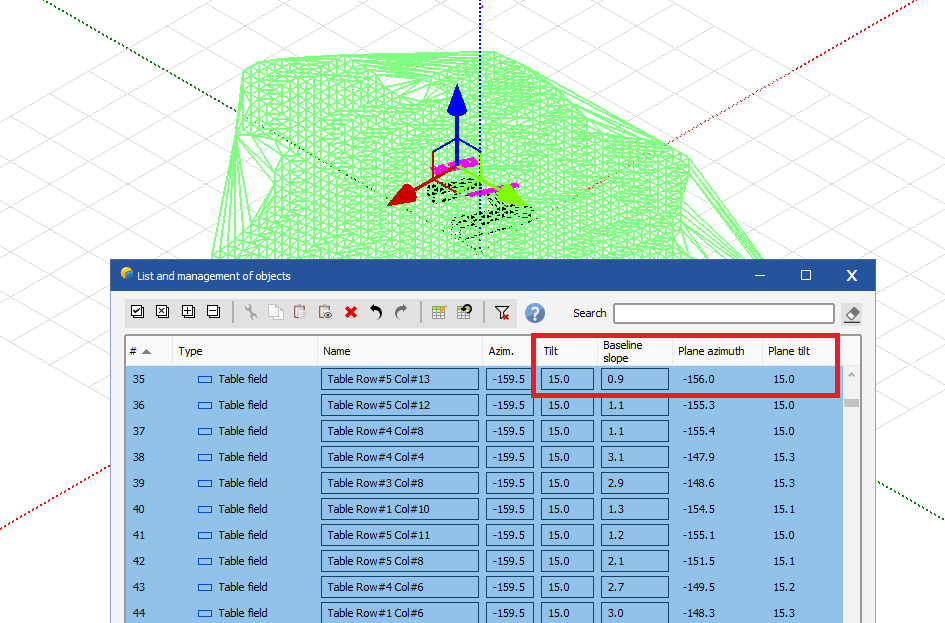
Dear Daniel,
With the "Auto-altitude" tool the tilt is readjusted according to the base slope of the terrain. You can check this behaviour by opening the "List and management of objects" after using the "Auto-altitude". The tilt and azimuth are updated according to the base slope:

-
2 hours ago, furkann71 said:
Hi,
'To adjust the tracker tilt to the terrain, you will need to create a zone of trackers within PVsyst, and draw the zone over the terrain. '
can you tell me how to do this
Dear Furkan,
The procedure to create zones is described in this help page: https://www.pvsyst.com/help/zones_of_tables.htm
Check "Create tracking fields" if you want your tables to be created as trackers.
Regards.
Hizir
-
Dear Roberto,
You are kindly requested to export and send your project (menu "File>Export project") and log files (menu "File>Export logs") to support@pvsyst.com so that we may investigate your issue.
Regards
Hizir
-
Dear Muhammad,
Tables need to be placed after importing the topography in order to follow the terrain.
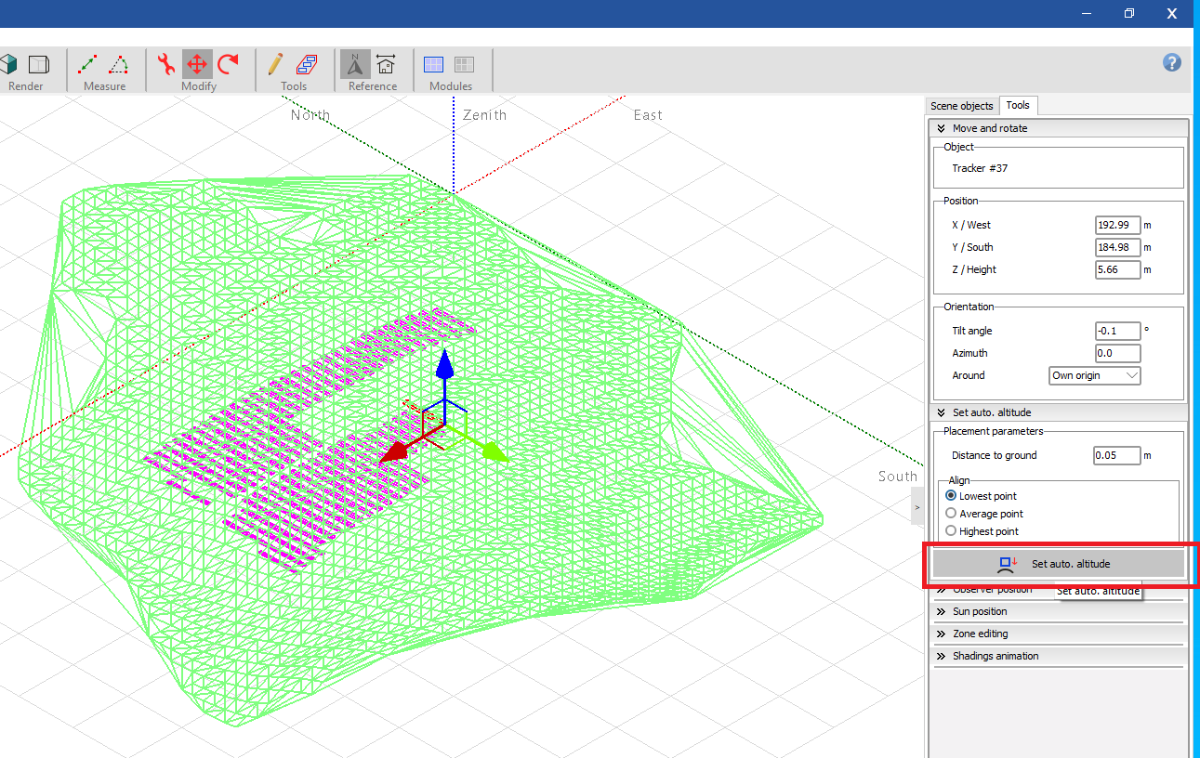
However, you can still reajust the position of your tables on the ground afterwards by using "Auto-altitude option" :
- Select all your tables and right-click on them. Then choose "Automatic altitude" option in the contextual menu:
- Click on "Set auto. altitude":
- Your tables will be placed on the ground:
Regards.
Hizir
-
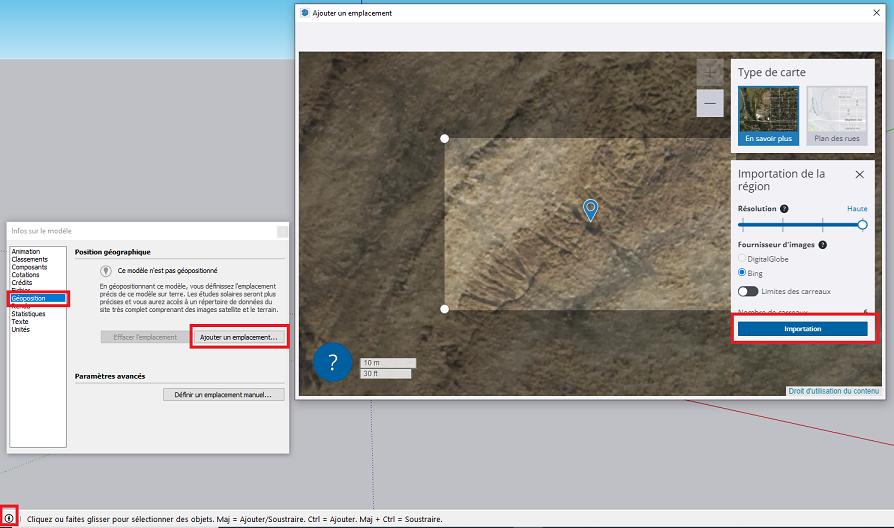
How to import a topology from Sketchup?
- Open Sketch Pro
- Click the Add Location tool on the Location toolbar or select File>Geolocation>Add Location.
- In the Add Location window that appears, type an address or intersection where your desired terrain is located.
- Click the Search button, and an aerial view of your location appears in the window.
- Click Select Region in the upper right.
- Drag the corners of the selection box to refine the location.
- Click the Grab button in the upper right, and your location’s terrain is imported into your model as a layer.
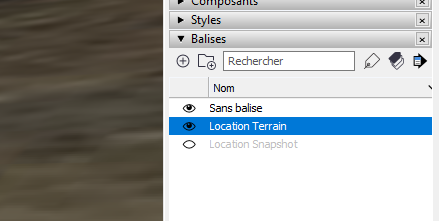
In the layers list, make Snapshot layer invisible and Terrain layer visible :
Right click on the ground image and select Unlock then Explode
- From menu File>Export>3D model, save the terrain as .DAE file
- In PVsyst 3D scene, from the menu File>Import>Import a 3D scene (3DS, DAE,PVC), select and import the .DAE file
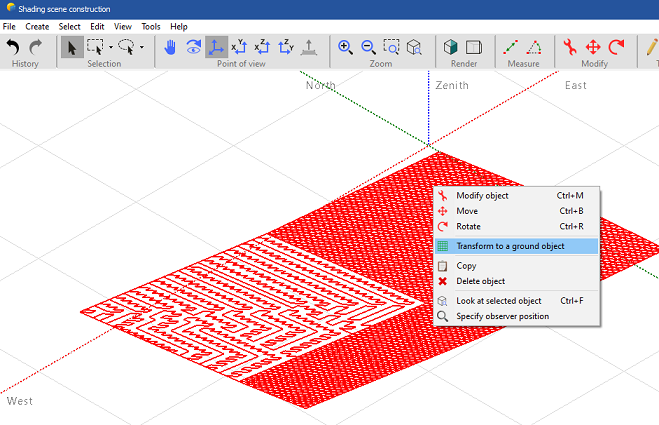
- Click on OK in the import dialog: your 3D object is imported in the 3D scene
- Right-click on it and select Transform to a ground object
-
Converting an Autocad .DWG to .DAE from Sketchup
• Open Sketchup Pro
• Click on File>Import and select an Autocad .DWG file
• Click on File>Export>3D model
• Select Collada (*.DAE) and save your file.
• In PVsyst 3D scene, from the menu File>Import>Import a 3D scene (3DS, DAE,PVC), select and import your file .DAE file -
How to import a ground topography from GoogleEarth?
• Open Google Earth Pro (this software is free even if it’s called “Pro”)
• From the menu Tools>Options>Navigation, check Do not automatically tilt while zooming (in order to be always in a perpendicular top view from the ground)
• Select a location by setting an address or by scrolling with the mouse
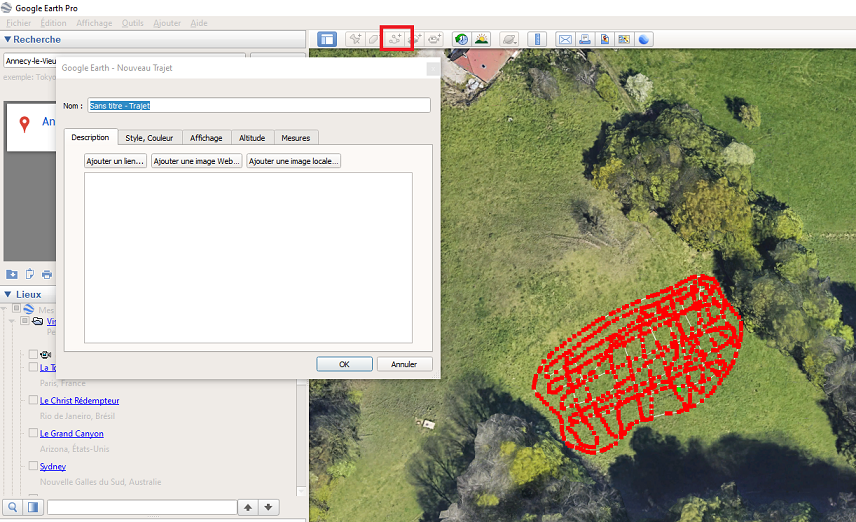
• Click on the Path tool and draw as many points as possible with the mouse to define the desired area (the polygon tool will only generate the elevation data for the polygon’s corners, it’s not sufficient to extract the topography of the polygon area)
• On Altitude tab, select Clamped to ground
- Click on OK to close the path tool
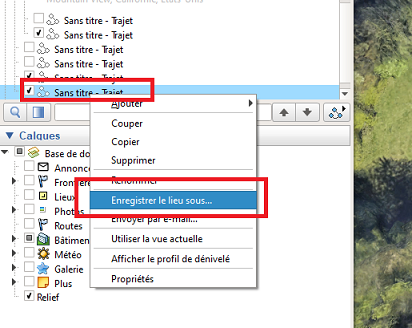
- Select the generated path and save it as a KML file :
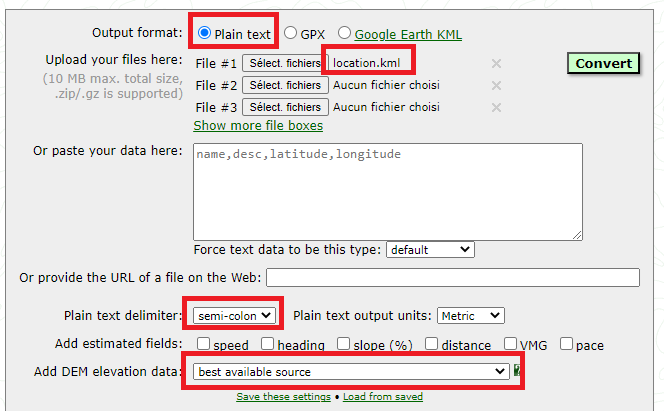
- Go to https://www.gpsvisualizer.com/convert_input
- Select Plain text as Output format
- Select your KML file from Upload your files here
- Select Semi-colon for Plain text delimiter
- Select Best available source in Add DEM elevation data list (you can also manually select a source and compare it with other sources to select the best one)
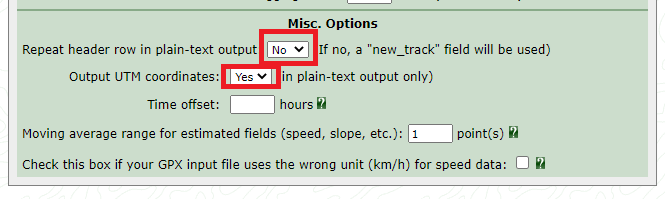
- Click on Show advanced parameters
- Select No for Repeat header row in plain-text output
- Select Yes for Output UTM coordinates
- Click on Convert
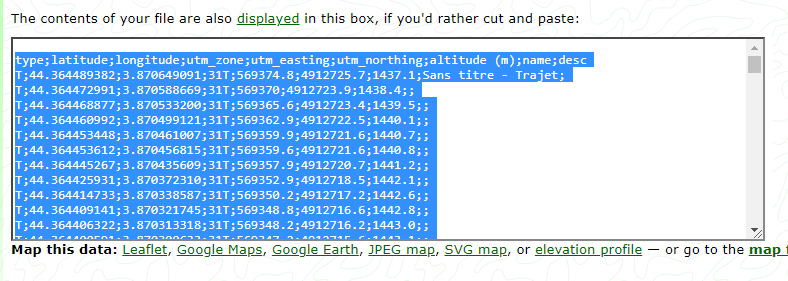
- Copy the generated content
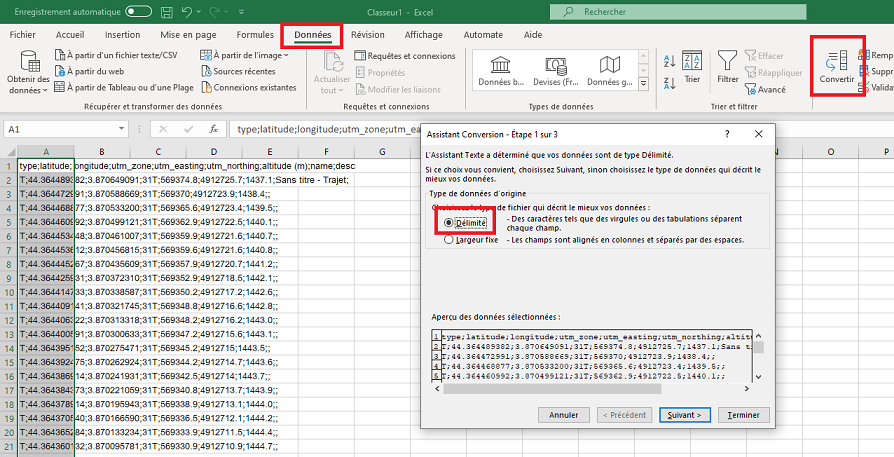
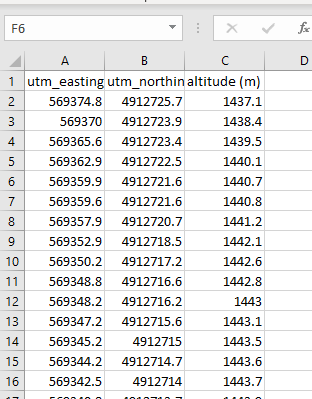
- Past the content to Excel
- Click on menu Data>Convert and select Delimited file
- Click on Next and select Semi-colon as delimiter, click on Next
- Remove the first 4 columns (from type to utm_zone), keep only columns utm_easting, utm_northing and altitude
- Save as .CSV and close Excel
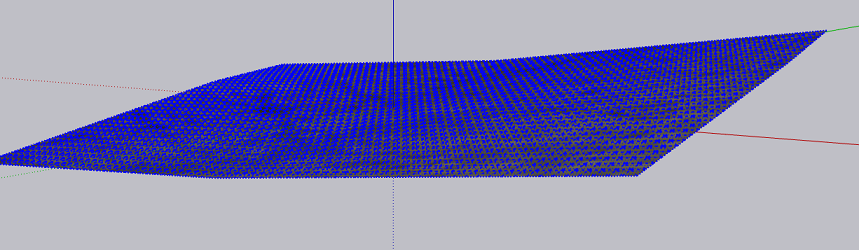
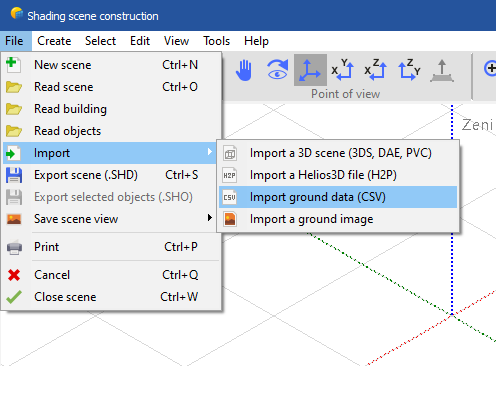
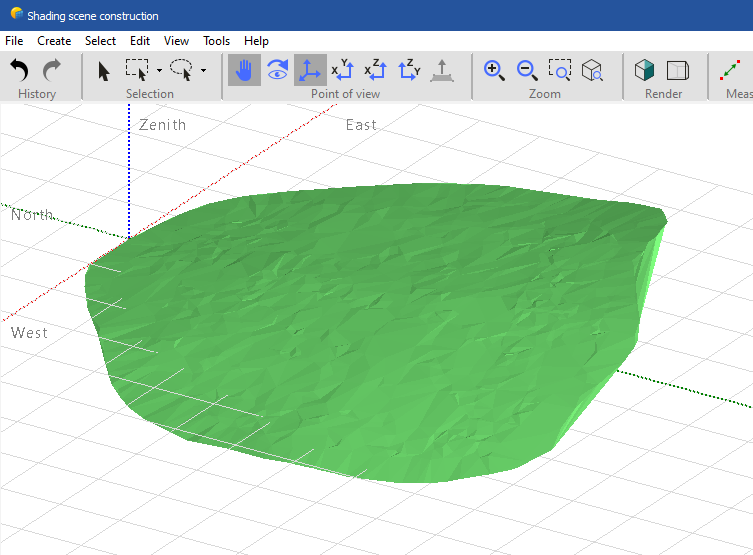
- In PVsyst 3D scene, from the menu File>Import>Import ground data (CSV), select and import your file
- Your topography should be correctly imported. Please note that if you are in the Northern hemisphere you might need to rotate the ground object by 180° around the scene origin in order for it to be properly placed
-
Dear Nayeem,
You are kindly requested to export (PVsyst menu File>Export logs) and send us your log files to support@pvsyst.com so that we may investigate the issue.
Kind regards
Hizir
-
Dear JGM,
This feature is indeed part of our planned developments. We currently do not have a planned release date for it.
Regards,
Hizir
-
On 2/9/2023 at 2:07 PM, Ree said:
Im importing the google ground image in Pvsyst and then resizing it as described in website and its all going okay. I want to place module on it for right shading effect .How to provide the height in google image option
Dear Ree,
You can use the zone tool to fill the area with modules: https://www.pvsyst.com/help/zones_of_tables.htm
In the zone tool, you have the option to set the height of the modules from the ground.
Regards,Hizir
-
Dear Emir,
It's hard to analyze the discrepancy without viewing your files.
Could you please send them to support@pvsyst.com (your source .KML or .KMZ file if you have them and your CSV file)
We will study them in detail.
Regards.
Hizir
-
Dear JaHu,
We thank you for providing us details of your pricing.
Currently in PVsyst you can define 2 different daily tariff (Peak / Off Peak), which can be combined with 2 seasonal tariff (summer/winter).
It's not possible to define a third daily pricing, nor a weekday depending price (price different for Saturday and Sunday in your example).
The only way is to use a custom CSV file with all the hours of the year and the corresponding price for this hour.
However, in your example you have a size dependent charge (maximum demand and network access charge), which is currently not managed by PVsyst in the economic evaluation. You will be able to only define the fix pricing corresponding to each hour (2.290, 1.850, 1.410). For the monthly charge dependent part, a solution would be to create a fixed yearly operating cost corresponding to the total manually precalculated charge for your installation size).
Regards.
Hizir
-
On 1/13/2023 at 9:23 PM, Debbie said:
In V7.3.1 the notes on the report cover seem to be limited to one line. At least for my computer system. Can you check this for the new release?
Thank you!
-Debbie
Dear Debbie,
This is indeed a known issue of the last version. We have already corrected it and the fix will be available in the upcoming version.
Regards.
Hizir.
-
Dear Marco,
Yes we have already noticed this issue. A corrective patch will be available soon.
Regards
Hizir
-
Dear Antonnio,
You are kindly invited to send your log files (menu File>Export logs), customer ID and license number to support@pvsyst.com
Regards.
Hizir
-
Dear kjs55,
We thank you for this suggestion. We will study the possibility of implementing this modification or not for a later version.
Regards


DELETE PROJECT FROM RECENT PROJECTS
in How-to
Posted
Hi,
You can do it from menu "File>Recent projects>Clear recent projects list"
Regards